All of the iPhones that have a built-in iOS11 or even later have a screen recording feature in them. Before getting started with the steps for screen recording on your iPhone, you need to know how to add screen record on iPhone.
In this article, I will be discussing “how to screen record on iPhone” and more. Keep reading till the end of the article to find out more information about the same!
Adding Screen Record On Your iPhone Is Easy
If the “screen record” button is not located in the Control Center then you are going to have to add it first. Doing so is going to make it much easier for you to start recording.
Here is a list of steps that you need to follow to add the screen recording button to the Control Center:
Step 1
First, you need to open up your Control Center. This can be done by swiping down the screen from the top right-side corner / swiping up (for people having iPhones 8 or earlier).
Step 2
Then, you need to look for the button meant for “screen recording”. It appears as a dot with a circle ’round it. If you happen to see it, then you can skip right to the next section of the article.
Step 3
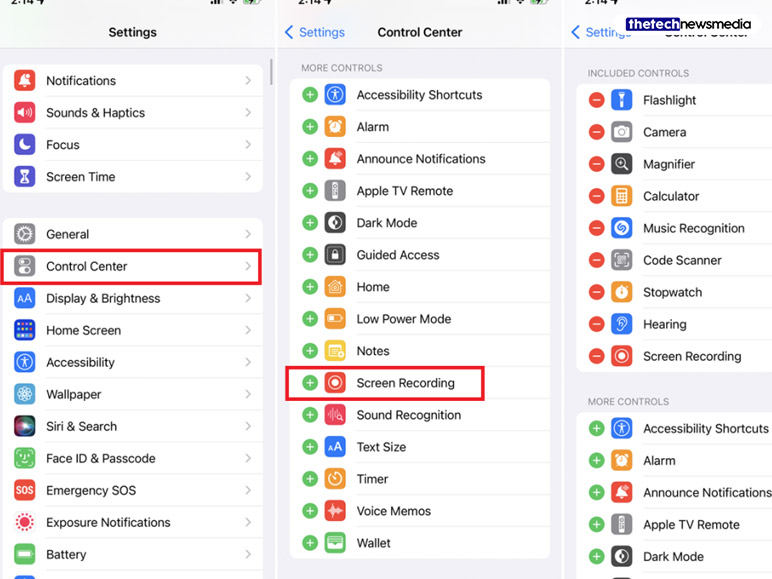
If the button is not there then you are going to have to click on the option labeled “settings” and then “control center”. Next, you are going to have to use the option labeled “customize controls”.
Step 4
Next, you need to scroll down to the menu marked “More Controls” and locate the “Screen Recording” option here.
Step 5
Now, you need to tap on the “+” icon which is going to be located on the left side of the text. After you do that, the feature is going to jump to the section of “Included Menu Controls”.
Step 6
You can also remove the button meant for “screen record” by clicking on the “Control Center” at any time, returning to the screen, and then tapping the red colored symbol of “-“.
Keep reading till the end of the article to get to know more about “how to record screen on iPhone”!
Steps To Recording Your Screen On Your iPhone
In this section of the article, I will be discussing the steps to recording your screen on your iPhone device.
The screen recording feature of your iPhone is going to enable you to make a video of every tap/swipe on your device. It is one of the great iPhone hacks that is going to make your life much easier.
Now, finally onto the steps that need to be followed for screen recording on your iPhone:
Step 1
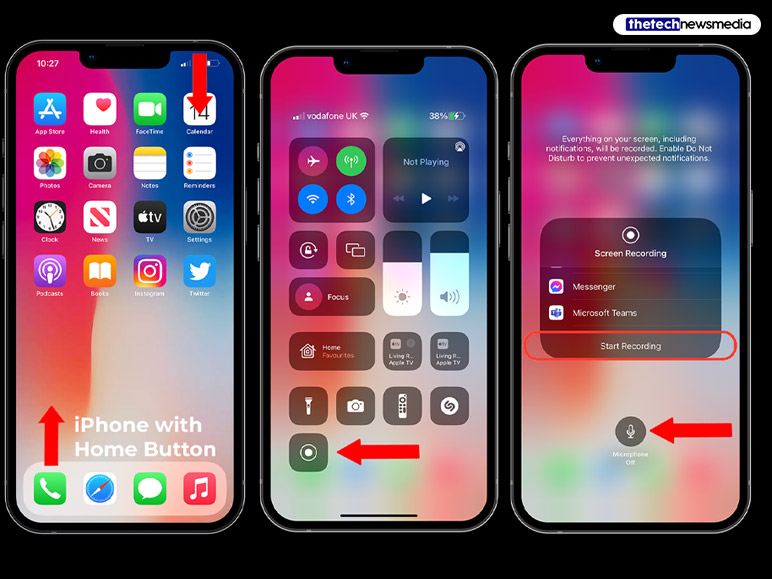
First, you need to swipe down or up (for iPhone 8 or later) to open the Control Center.
Step 2
Then click on the “Record button” that is situated there.
Step 3
You are going to see a 3-second countdown appear after which the clock on the left-hand corner of your screen is going to turn red. If you happen to have an older iPhone, then the red bar is going to appear at the top of your screen instead.
Step 4
Next, click on the screen to close the Control Center.
Step 5
After you are ready you can stop recording by clicking on the red clock that is situated at the top and then clicking ‘Stop’.
Tip: The steps mentioned above are also the answer to “how to screen record on iPhone 13”.
Edit Your Saved Recording
The recording that you made is going to be saved in the Camera roll in the Photos application. Right from there, you are going to be able to use the editing tools of your iPhone to do various edits to your videos – trimming the video, adding filters, and saving the video in the form of a clip.
Step 1
First of all, you are going to have to open up your Camera roll in the Photos application and then tap on the video.
Step 2
Next, click on the “Edit” option that is going to be situated on the top right side of the screen.
Step 3
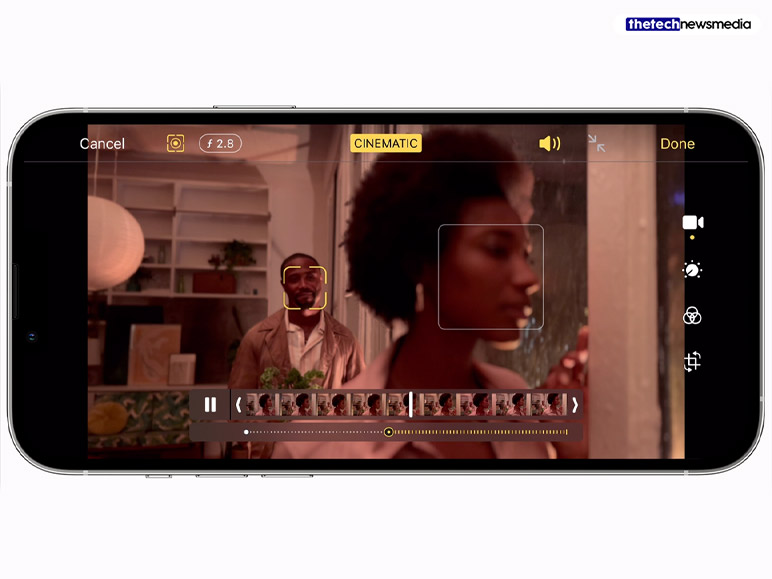
Then, towards the bottom of the screen, you are going to see a visual timeline of the video that you shot.
For trimming the beginning of the video, you can tap and then click the drag arrow which is situated right beside the “Play button” on the right. It is going to turn yellow then. Then you can trim the end by dragging and tapping the arrow located towards the left side.
Step 4
Now, press the Play button to view the new version. You can keep adjusting the arrows till you are satisfied with the result.
Step 5
Now, you are going to be able to change the filters with the same buttons that you are going to use in the application for Photos.
Step 6
Finally, when you are ready to save your edited video, click on the Done and then the option that’s labeled “Save as New Clip”.
To Wrap It Up!
That was all for the steps that you need to follow to add the screen record option on your iPhone device. If you are still having a problem adding it then, you could try out other third-party screen recording apps that are available out there.
Thank you for reading till the end of this article. I hope you found the information regarding “how to screen record on iphone” to be useful.
Also Read
- What Is PCPartpicker?
- How Often Does Lenovo Outlet Update?
- Lenovo Ideapad Gaming 3 – Overview, Specification, Price
Feature image source:-http://tinyurl.com/5yjd2nmr